Editor’s Note: This is mirrored from RayWenderlich.com.
IBM’s Kitura is a very popular and exciting server framework, but did you know it can be used to create web apps?
In this tutorial on Kitura and Stencil, you’ll pick up from the first part of this tutorial series and do the following:
- Add the
Stencildependency to your project. - Create a basic website interface.
- Add a route to your API for your website.
- Make your Swift code interact with HTML.
If you’re new to Kitura, or haven’t set up CouchDB on your system yet, check out the Server Side Swift with Kitura tutorial first.
Getting Started
Just like the previous tutorial, you’ll need the following available to you:
- MacOS 10.12 or higher
- Xcode 9.2 or newer
- CouchDB
- Basic familiarity with Terminal, as you’ll use the command line quite a bit
You also need to make sure CouchDB is running. If you installed CouchDB via Homebrew, open Terminal and enter this command:
brew services start couchdb
If you get a message that says successfully started or already started, you’re good to go!
Running the Starter Project
Use the Download Materials button at the top or bottom of this tutorial to download the starter project. This has additional files that aren't part of the previous tutorial, so you’ll need to download this starter even if you’ve completed the prior tutorial.
Open Terminal and navigate to the root directory for your project, where Package.swift lives. Then, enter the following command:
swift build
You should see a succession of logs followed by this at the end:
Compile Swift Module 'KituraWebInterface' (5 sources)
Linking ./.build/x86_64-apple-macosx10.10/debug/KituraWebInterface
swift build
Input the following command and press Enter:
.build/debug/KituraWebInterface
You should see logs about starting the application, and a window may pop up asking you to allow incoming connections. If so, click Allow.
Next, open a new Terminal window and enter the following command:
curl -X POST http://localhost:8080/acronyms -H 'content-type: application/json' -d '{"short": "AFK", "long": "Away from keyboard"}'
Unless you’ve already added this acronym, you should get a JSON response representing the new acronym. Then enter the following command:
curl http://localhost:8080/acronyms
All of the acronyms stored in CouchDB will be displayed. If you completed the previous tutorial, you may see more than just the AFK acronym.
Before you generate the Xcode project, you’ll add a few directories to organize your frontend app. Press Control-C to stop the app and carry on!
How the Backend Organizes Data
Whenever you made a GET request via the browser, your backend searches these available routes:
app.router.get("/acronyms", handler: getAcronyms)
app.router.post("/acronyms", handler: addAcronym)
app.router.delete("/acronyms", handler: deleteAcronym)
The API matches against each route by considering the HTTP verb, which in this case is GET, and the route path, which is /acronyms.
However, a user doesn’t think in HTTP terms — they just want to see what they’re interested in. This is where the user interface comes in.
How the Web Frontend Organizes Data
The same routers that handle your data endpoints render your user interfaces. The only difference is the route’s closure returns HTML instead of JSON.
At the root of nearly any Kitura web app, you’ll see two directories: public and Views. The public directory usually contains four subdirectories:
html: Contains files for determining how the UI is put together.css: Contains definitions for “themes” and how the content is styled.js: Contains JavaScript files for onscreen user interaction and other under-the-hood functionality.img: Contains images, cat pictures and memes mostly!
The public directory holds only static files, but Kitura can do more than just serve static files.
Kitura uses a tool called Stencil to render webpages and populate dynamic page content based on information passed from your Swift API. Stencil lets you create templates to display content from your APIs in a predetermined format.
For example, suppose you want to add a title to a page indicating the current month. A naïve approach could look like this:
<!DOCTYPE html>
<html>
  <head>
    <title>The current month is December!</title>
  </head>
</html>
This works only 1/12th of the time: when it’s December!
What if your API could instead calculate the current month and provide a string from that calculation to use as the title? In your Swift code, you’d pass that string to the renderer, and your Stencil template might look like this:
<!DOCTYPE html>
<html>
  <head>
    <title>The current month is {{ currentMonth }}!</title>
  </head>
</html>
Notice the curly braces? This is how you tell Stencil to insert information into the HTML from a context. The workflow for Stencil is essentially this:
- Prepare data from your API.
- Set up a context: a dictionary of key/value pairs.
- Populate your context with the values you want to display.
- Render a template in your response, using a context.
With this workflow, you never have to worry about manually updating your webpage content. Instead, it is generated dynamically from the API.
Stencil templates typically have the extension .stencil or .html.stencil and go in the Views directory. This is where Stencil looks for them when you tell it to render one.
Adding the Stencil Dependency
Before you can use Stencil, you need to add it as a dependency for your project. Open Package.swift in Xcode, and replace its contents with the following. The only changes are below the two commented lines:
// swift-tools-version:4.1
import PackageDescription

let package = Package(
  name: "KituraWebInterface",
  dependencies: [
    .package(url: "https://github.com/IBM-Swift/Kitura.git", .upToNextMinor(from: "2.4.1")),
    .package(url: "https://github.com/IBM-Swift/HeliumLogger.git", .upToNextMinor(from: "1.7.1")),
    .package(url: "https://github.com/IBM-Swift/Kitura-CouchDB.git", .upToNextMinor(from: "2.1.0")),
    // 1
    .package(url: "https://github.com/IBM-Swift/Kitura-StencilTemplateEngine.git",
             .upToNextMinor(from: "1.10.0"))
  ],
  // 2
  targets: [ .target(name: "KituraWebInterface",
                     dependencies: ["Kitura" , "HeliumLogger", "CouchDB", "KituraStencil"]) ]
)
Here’s what the changes do:
- You declare a dependency on Stencil, using its fully qualified Git URL.
- You add Stencil to your target, so it will link correctly.
Save and close this file.
Open Terminal and navigate to the root project directory, which contains Package.swift, and enter this command:
swift build
This will setup the new dependency on Stencil. Nice!
Note: Stencil is not fully updated with the latest Swift changes so you’ll probably see a host of warnings. They can safely be ignored.
You’re making excellent progress, but you have a little more to set up before you can get to coding.
Configuring the Kitura Stencil Tutorial Project
You next need to set up some directories to keep your project organized.
Still in your project’s root directory in Terminal, enter the following commands:
mkdir Views
cd Views
touch home.stencil
touch header.stencil
touch add.stencil
cd ..
You’ve just created the Views directory, populated it with three template files and returned to the root directory.
Next, enter the following commands:
mkdir public
cd public
mkdir css
mkdir img
touch css/index.css
cd ..
You’re simply creating the directory structure and empty files for now. You’ll populate these files shortly.
Create a Swift file for handling the client route:
touch Sources/KituraWebInterface/Routes/ClientRoutes.swift
Finally, open your project directory in Finder. You can do this most easily by entering in Terminal:
open .
Find the file kitura.jpg in your downloaded materials and drag it into the img directory.
Your project directory should now look like this:

Go back to Terminal, and execute the following commands from your project’s root directory:
swift package generate-xcodeproj
open KituraWebInterface.xcodeproj
You should now have the following window open in Xcode:
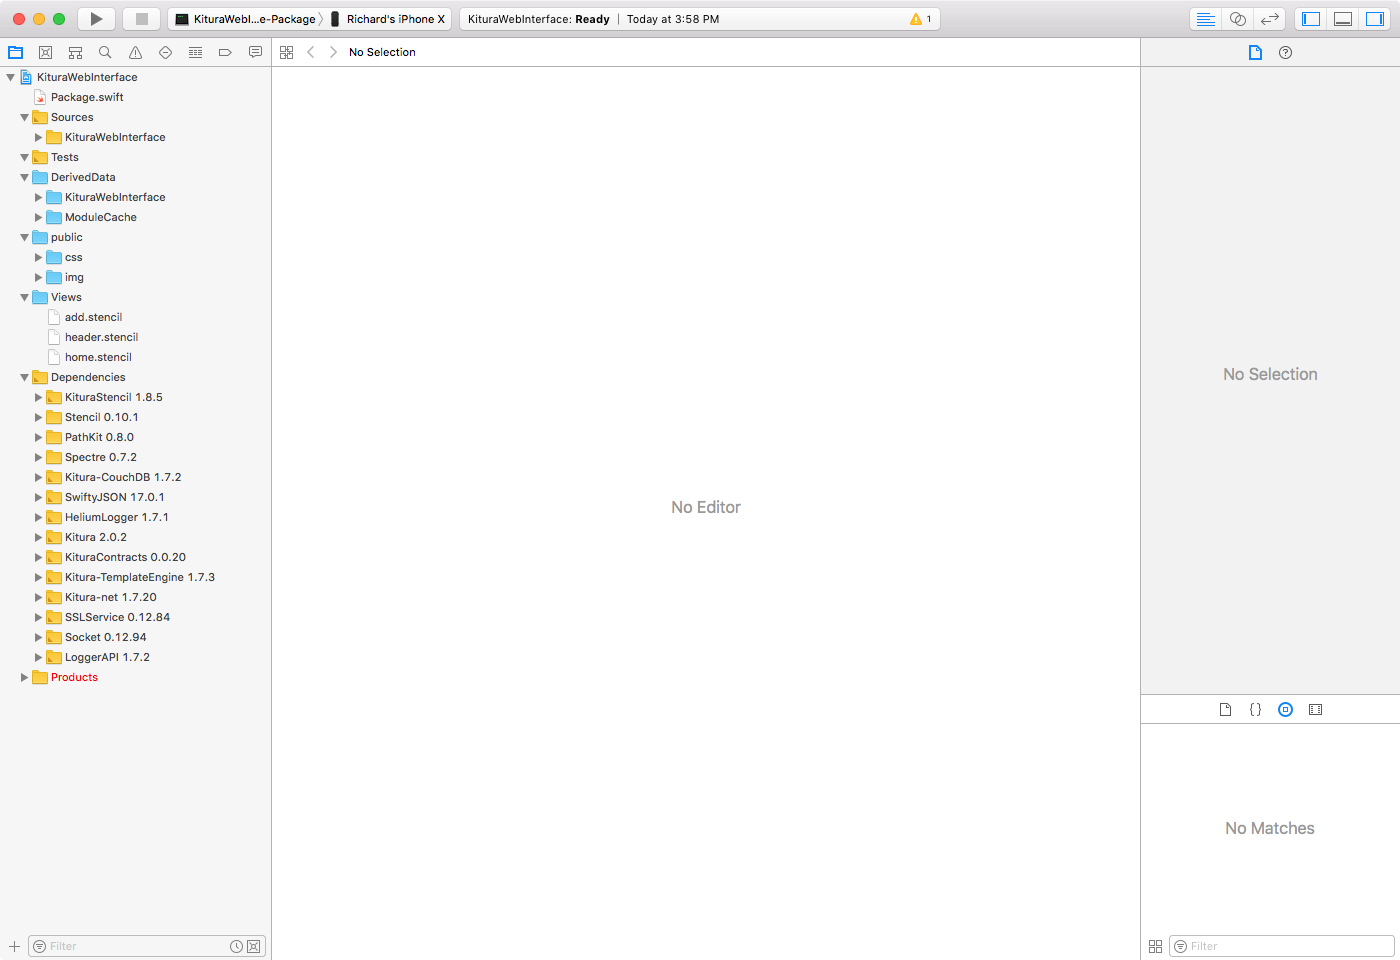
Take a look at your File Hierarchy, and you’ll notice everything is nicely organized.
Note: Once again, ignore any warnings about Swift 4 conversions and deprecations. These are expected with the current version of Stencil.</div>
There are only two more things you need to do before writing code. Just like in the previous tutorial, you need to set the current scheme’s executable so you can build and run the project in Xcode.
First, go to the Select Scheme dropdown and select Edit Scheme.

In the window that pops up, click on the menu next to Executable and select KituraWebInterface. Then, click Close to dismiss the pop-up.
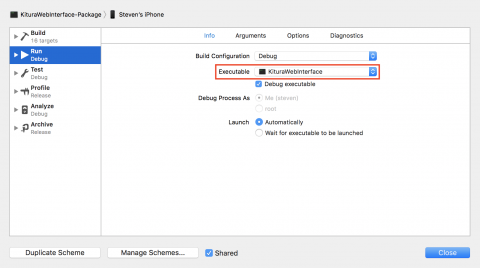
Next, click on the drop-down to the right of the Select Scheme dropdown, and select My Mac (if it’s not selected already).
Build and run. Then, open your web browser and go to http://localhost:8080 to make sure the Kitura home page loads.
Now, you’re finally ready to do some web coding!
Preparing Your Web UI
Note: Xcode isn’t the best tool for editing HTML, CSS and Stencil files. You can get basic syntax coloring via Editor menu ▸ Syntax ▸ Coloring and choosing the file type, but this won’t recognize Stencil tags. For a better experience, you can use this extension for Visual Studio Code written by a Ray Wenderlich team member.
Open index.css and replace its contents with the following:
* {
  margin: 0;
  padding: 0;
  box-sizing: border-box;
}
.menu-container {
  color: #000;
  padding: 20px 0;
  display: flex;
  justify-content: center;
  font-family: 'Open Sans', 'helvetica Neue', 'Helvetica', 'Arial', "Lucida Grande", sans-serif;
}
.menu {
  border: 1px solid #FFF;
  width: 900px;
}
.menu-add {
  color: #000;
  padding: 2px;
  display: flex;
  justify-content: space-around;
  font-family: 'Open Sans', 'Arial', sans-serif;
}
.menu-add-component {
  color: #000;
  display: flex;
  justify-content: space-around;
  width: 300px;
  font-family: 'Open Sans', 'Arial', sans-serif;
}
input.button-primary {
  background-color: #00B3E4;
  color: #FFF;
  border-color: black;
  padding: 4px;
  font-family: 'Open Sans', 'Arial', sans-serif;
}
input.acronym-field {
  font-family: 'Open Sans', 'Arial', sans-serif;
  border-color: #333;
  border-width: 1px;
}
::-webkit-input-placeholder {
  font-family: 'Open Sans', 'Arial', sans-serif;
}
:-moz-placeholder {
  font-family: 'Open Sans', 'Arial', sans-serif;
  opacity: 1;
}
::-moz-placeholder {
  font-family: 'Open Sans', 'Arial', sans-serif;
  opacity: 1;
}
:-ms-input-placeholder {
  font-family: 'Open Sans', 'Arial', sans-serif;
  color: #909;
}
::-ms-input-placeholder {
  font-family: 'Open Sans', 'Arial', sans-serif;
  color: #909;
}
A complete discussion of CSS is outside the scope of this tutorial. However, this essentially sets various styles for the components you’ll be adding in HTML. You also use a framework called FlexBox to make it easier to organize content within a web page.
Next, open header.stencil and replace its contents with the following:
<div class='menu-container'>
  <div class='title'><h1>TIL: Today I Learned<img src="/img/kitura.jpg"></h1></div>
</div>
This showcases a key element of Stencil template files: composition. You can define small templates to reuse in larger templates inside of loops. Here, header.stencil will simply be included at the top of each page, but the next example will showcase just how useful Stencil templating can be.
Open home.stencil, and replace its contents with the following:
<!DOCTYPE html>
<html>
<head>
<title>TIL - Kitura</title>
<link rel="stylesheet" href="/css/index.css">
<link rel="stylesheet"
href="//fonts.googleapis.com/css?family=Open+Sans:300,400,600,700&amp;subset=latin,latin-ext">
</head>
<body>
<!--1-->
{% include "header.stencil" %}
<div class="menu-container">
<h2>Existing Acronyms</h4>
</div>
<div class="menu-add">
<div class="menu-add-component">
<h3>Short Form</h3>
</div>
<div class="menu-add-component">
<h3>Long Form</h3>
</div>
</div>
</body>
</html>
The line below the comment labeled <!--1--> shows how Stencil allows dynamic content to be passed into the template.
To see what this actually looks like, you’ll next write a route to render the page.
Adding a Kitura Route to Render your Template
Open ClientRoutes.swift and enter the following:
import Foundation
import KituraStencil
import Kitura

func initializeClientRoutes(app: App) {
  // 1
  app.router.setDefault(templateEngine: StencilTemplateEngine())
  // 2
  app.router.all(middleware: StaticFileServer())

  // 3
  app.router.get("/") { _, response, _ in
    // 4
    let context: [String: Any] = [:]
    // 5
    try response.render("home", context: context)
  }
}
Here’s what that does, step by step:
- With Kitura, you have a choice between templating engines. This tutorial uses Stencil, but you can choose from others such as
MustacheorMarkdown. - Here you set up a handler to serve the static files in the
publicdirectory. - This is actual definition for your route. Notice how you override the main home page path? This means this route will respond when you visit
<a href="http://localhost:8080" rel="noopener" target="_blank">http://localhost:8080</a> - This is where you define the context to pass into your rendered response. The
renderfunction does not acceptnilfor a context; instead, you should always provide a context of type[String: Any]. - Notice that, because you set Stencil as the default template engine, you can leave off the default
.stencilextension when referring to templates.
Now to add a router to render the response.
Open Application.swift and replace finalizeRoutes(with:) with this:
private func finalizeRoutes(with database: Database) {
  self.database = database
  initializeAcronymRoutes(app: self)
  initializeClientRoutes(app: self)
  Log.info("Acronym routes created")
}
Now, whenever your application registers its routers with the main router, it will include this new router for your rendering response.
Build and run, open a web browser and visit http://localhost:8080.
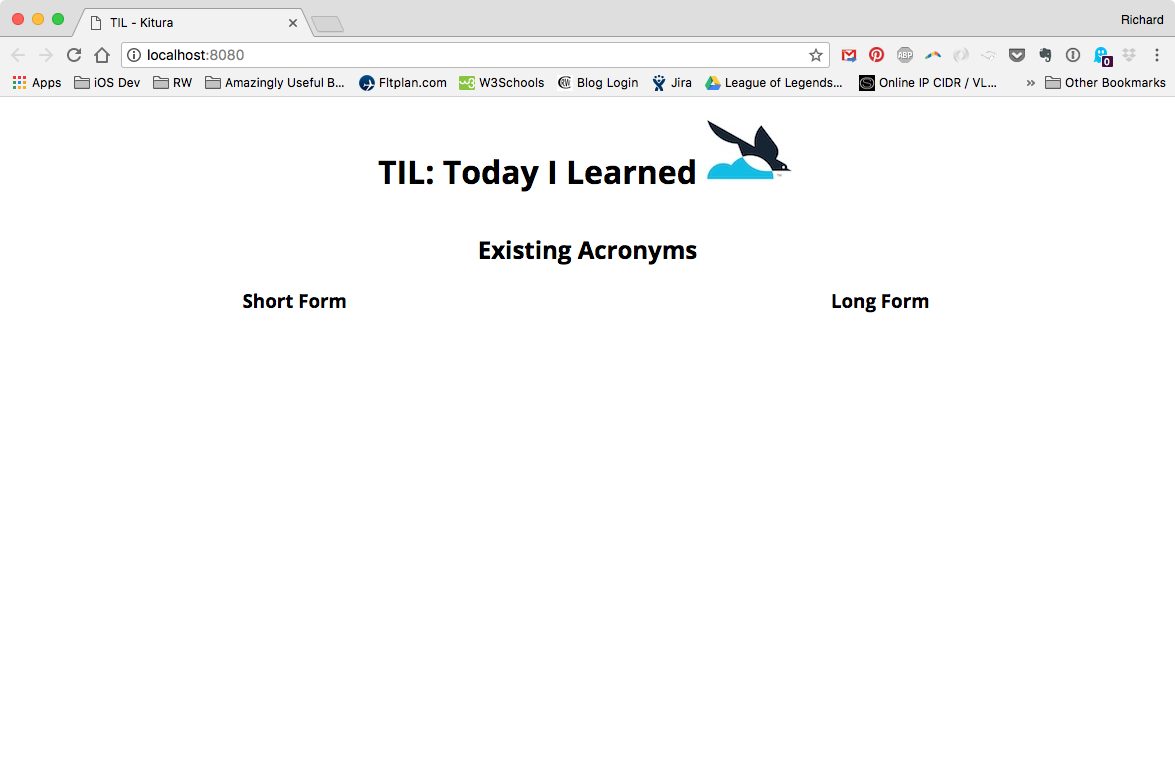
You’ve just rendered your first HTML template using Swift!
Next, you need to make your page display some acronyms.
Passing a Context to Stencil
It would be great if the acronyms from your database were displayed on the webpage. To do that, you first need to place them in a context.
Open ClientRoutes.swift file, and replace the get route with this:
app.router.get("/") { _, response, _ in
  if let database = app.database {
    // 1
    Acronym.Persistence.getAll(from: database) { acronyms, error in
      guard let acronyms = acronyms else {
        response.send(error?.localizedDescription)
        return
      }
      var contextAcronyms: [[String: Any]] = []
      for acronym in acronyms {
        // 2
        if let id = acronym.id {
          // 3
          let map = ["short": acronym.short, "long": acronym.long, "id": id]
          contextAcronyms.append(map)
        }
      }
      // 4
      do {
        try response.render("home", context: ["acronyms": contextAcronyms])
      } catch let error {
        response.send(error.localizedDescription)
      }
    }
  }
}
Here’s what this does:
- First, you call
Persistence.getAllto retrieve all of the acronyms. - You’ll soon add support for creating an
Acronym, but for now, you only use those that already have anidwithin the database. - In order for Stencil to read properties from your context, you must serialize them. Stencil doesn’t yet support automatic serialization through
Codableso you do it the old fashioned way. - Finally, you set the
contextAcronymsusing the key"acronyms". Later on, you’ll use this same key to access this array in HTML.</code>
Next, you must update home.stencil to use the new array you passed via the context. Replace the contents of body within home.stencil with the following:
<body>
  {% include "header.stencil" %}
  <div class="menu-container">
    <h2>Existing Acronyms</h2>
  </div>
  <div class="menu-add">
    <div class="menu-add-component">
      <h3>Short Form</h3>
    </div>
    <div class="menu-add-component">
      <h3>Long Form</h3>
    </div>
  </div>
  <!--1-->
  {% for acronym in acronyms %}
    <div class="menu-add">
      <div class="menu-add-component">
        <!--2-->
        <h5>{{ acronym.short }}</h5>
      </div>
      <div class="menu-add-component">
        <!--3-->
        <p>{{ acronym.long }}</p>
      </div>
    </div>
  {% endfor %}
</body>
Here’s the play by play:
- Here, you use the context values passed into Stencil: you loop through all available acronyms and create template HTML for each.
- In the same manner, you display the short version for each acronym.
- Finally, you display the long version.
Build and run, and navigate your web browser to http://localhost:8080.
Depending on how many acronyms you have stored in your database, your webpage should look something like the following:

As a final touch, you’ll add a UI so you can add and remove acronyms through the web app.
Adding a Template for Creating Acronyms
Open add.stencil and enter the following:
<div class="menu-container">
  <h2>Add New Acronym</h4>
</div>
<div class="menu-add">
  <label>Acronym</label>
  <input id="shortField" class="acronym-field" name="short" placeholder="e.g. BRB" />
  <label>Long Form</label>
  <input id="longField" class="acronym-field" name="long" placeholder="e.g. Be Right Back" />
  <input class="button-primary" type="submit" value="Save Acronym" onClick="submitForm()">
</div>
You’ll use this HTML template at the top of the page to allow the user to create a new Acronym. In particular, look at the line for button-primary, which has onClick set to submitForm. You need to create a JavaScript function for this. At the end of the file, add the following:
<script type="text/javascript">
function submitForm() {
  // 1
  var short = document.getElementById("shortField").value;
  var long = document.getElementById("longField").value;
  if (long == "" || short == "") {
    // 2
    alert("Both fields must contain text!");
    return;
  }
  var xhr = new XMLHttpRequest();
  xhr.open("POST", "/acronyms");
  // 3
  xhr.setRequestHeader("Content-Type", "application/json");
  xhr.onreadystatechange = function() {
  if (xhr.readyState == XMLHttpRequest.DONE) {
     // 5
     location.reload();
    }
  }
  // 4
  xhr.send(JSON.stringify({ "short": short, "long": long }));
}
</script>
Here’s what this does:
- Here you access form fields and prepare to populate your JSON request to your API.
- Just as you placed object validation on the backend, it’s good practice to duplicate your validation on the front-end.
- Since your API is using Codable Routing, you need to set your content header appropriately.
- You send your JSON with this handy
stringifyfunction to serialize your data. - When the request receives a response, you reload the page to update what you see in your list.
Now you’ll add this template to the home page.
Open home.stencil and find the line that has
{% include "header.stencil" %}
Add the following right after that line:
{% include "add.stencil" %}
This will include everything you wrote in add.stencil. This is a great way to separate out reusable components.
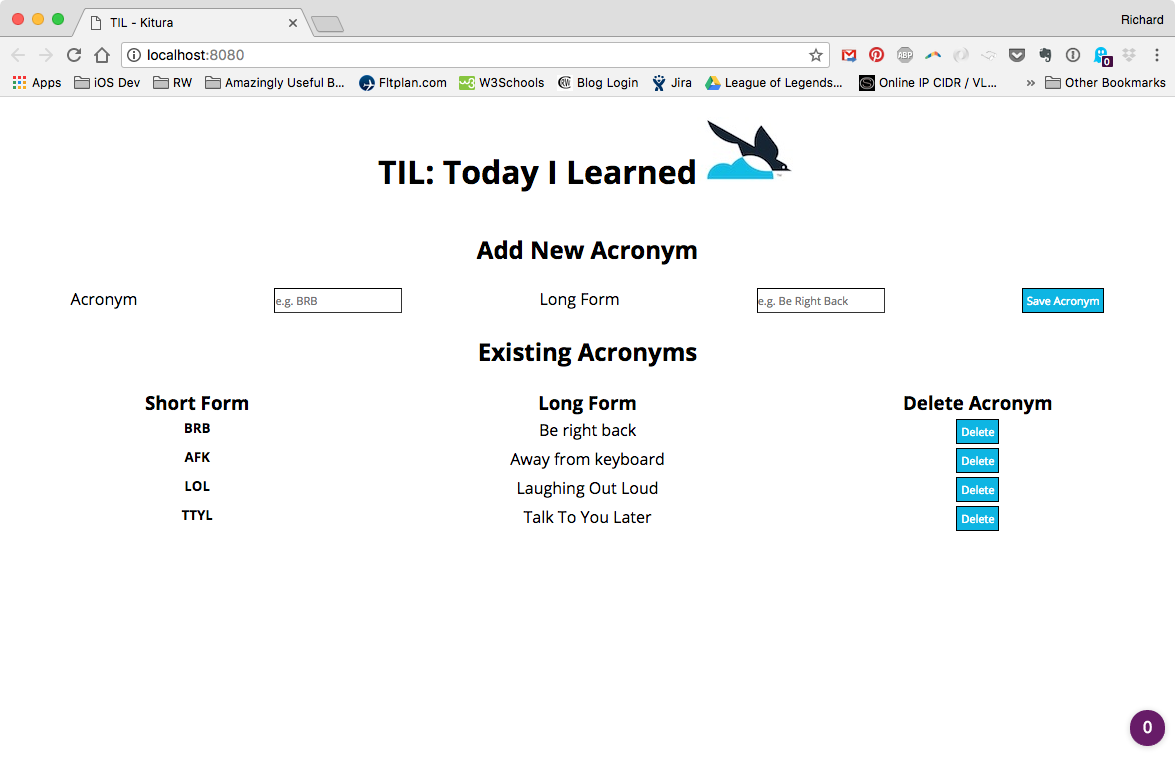
Reload your webpage, it should look like this:

Try using your fancy new UI to add a couple of new acronyms. After you click the Save Acronym button, you’ll either see a refreshed page, or an alert if you didn’t enter text for both fields!
You’re almost at the finish line! You just need a way to delete acronyms.
Adding Delete Functionality
This is another place to take advantage of your templating abilities. Rather than create a UI where you enter an ID and then click delete for that acronym, wouldn’t it be nice to have a delete button next to each acronym?
Still in home.stencil file, replace everything inside the body tag with this:
<body>
  {% include "header.stencil" %}
  {% include "add.stencil" %}
  <div class="menu-container">
    <h2>Existing Acronyms</h2>
  </div>
  <div class="menu-add">
    <div class="menu-add-component">
      <h3>Short Form</h3>
    </div>
    <div class="menu-add-component">
      <h3>Long Form</h3>
    </div>
    <!--1-->
    <div class="menu-add-component">
      <h3>Delete Acronym</h3>
    </div>
  </div>
  {% for acronym in acronyms %}
    <div class="menu-add">
      <div class="menu-add-component">
        <h5>{{ acronym.short }}</h5>
      </div>
      <div class="menu-add-component">
        <p>{{ acronym.long }}</p>
      </div>
      <!--2-->
      <div class="menu-add-component">
        <input id="{{ acronym.id }}" class="button-primary one-line" type="submit" value="Delete" onClick="deleteAcronym(this.id)">
      </div>
    </div>
  {% endfor %}
</body>
Here’s what you added:
- Add a header to reflect your options below.
- Add a button to delete the acronym on a given line. Notice that the
idparameter makes use of the acronym’sid. This will be important shortly.
Below all of your HTML, you need to add one more JavaScript function. Just before the </body> tag, add the following:
<script type="text/javascript">
    // 1
    function deleteAcronym(acronymID) {
        var xhr = new XMLHttpRequest();
        // 2
        xhr.open("delete", "/acronyms/" + acronymID);
        xhr.setRequestHeader("Content-Type", "application/json");
        xhr.onreadystatechange = function() {
            if (xhr.readyState == XMLHttpRequest.DONE) {
                // 3
                location.reload();
            }
        }
        xhr.send();
    }
</script>
Here’s how this works:
- The button’s ID is used as a parameter to tell your function which acronym you want to delete.
- You use this parameter to create the correct URL.
- When the request completes, you refresh the page to update the UI.
Reload the page again. It should look like this:
Try deleting the acronyms you’ve already typed. After you click the delete button, the page should update and show that you did in fact delete the acronym!
You’ve just built a fully functional web application with a backend written in Swift! Pretty neat.
Where to Go From Here?
You can download the completed version of the project using the Download Materials button at the top or bottom of this tutorial. Because projects built using the Swift Package Manager (SPM) treat the .xcodeproj as disposable, it is not included. Run swift package generate-xcodeproj again to download the dependencies and generate an Xcode project.
Web templating is fun when you need to interface with your Swift API right away. I hope that Stencil helps you get on track for whatever it is you want to create, whether it’s a blog, a photo library or anything else you have in mind.
If you have any questions or comments, please join the forum discussion below!